 How Do HireHop and QuickBooks Integrate?
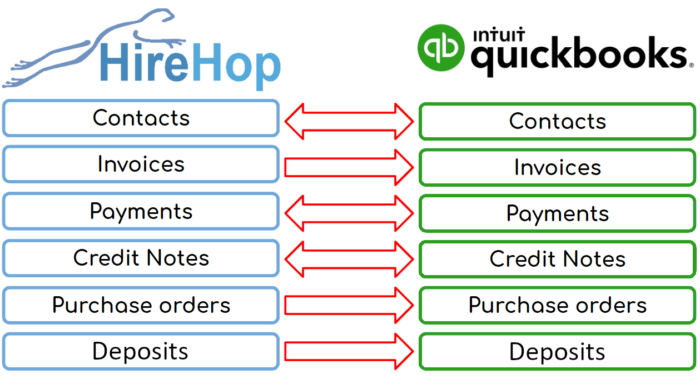
HireHop can produce your invoices, credit notes, payments and purchase orders. HireHop also has an address book that contains customers and suppliers, as well as jobs where the customer is unique and not in the address book. HireHop also keeps track of what has been paid and credited against invoices, as well as the balance of a customer’s account.
QuickBooks needs these invoices, credit notes, payments, purchases orders and contacts created in HireHop for bookkeeping purposes. With our integration working seamlessly behind the scenes, HireHop tells QuickBooks when they are created or updated so you don’t have to. In turn, HireHop needs to know what payments or credits have been applied in QuickBooks so that it can register invoices as being paid or not.
What Data Does HireHop Send To QuickBooks?
There are two modes to synchronise data between HireHop and QuickBooks – being live or buffered:
- In live mode, as soon as you create or edit an invoice, credit note, payment, or purchase order, it is immediately sent to QuickBooks.
- In buffered mode they are all kept in a buffer until such time you which to synchronise data between HireHop and QuickBooks. Any invoice, credit note, purchase order or payment that fails to sync with QuickBooks in Live Mode will automatically be put into the buffer for a manual sync. All buffered invoices and credits can be viewed in the Invoices to be Exported report.
HireHop invoices are sent to QuickBooks once the status has been changed to Approved or above. If an Approved invoice is edited, it is re-sent to be updated in QuickBooks. The same goes for Purchase Orders, Credit Notes and Payments.
All new contacts used in invoices and purchase orders are automatically sent to QuickBooks from HireHop.
In QuickBooks, an entry in the address book can’t be both a customer and supplier, therefore, as this feature is available in HireHop, when this happens, HireHop will create two entries in the QuickBooks address book, one for the customer address book, and one for the supplier address book.
Once you have synchronised or connected HireHop to QuickBooks, QuickBooks will authorise this connection for 3 months, after which time HireHop will prompt you to reconnect the next time a connection is needed.
What Data Does QuickBooks Send To HireHop?
Contacts are imported from QuickBooks into HireHop in Settings, enabling you to import only the contacts that you need so that your address book doesn’t become cluttered.
When a payment or credit note is applied to an invoice within QuickBooks, they are sent over to HireHop and registered to the corresponding invoice. The invoice status is then automatically marked as having been paid or not.
How To Setup QuickBooks With HireHop
- In HireHop Settings click the Accounts tab.
- In the Accounts click the New button on the right of the Accounting Packages table at the bottom of the screen, and a new accounts package window will open.
- Click the first option that is titled “Integrate with“, and select “QuickBooks“. You can then set prefixes and start numbers for invoices, credit notes and purchase orders. You can also choose to buffer transactions and sync them when you decide, instead of having live and automated updates. Click the Next button to move on.
- The “Accounts” page enables you to enter nominal codes and banks accounts. Click the Synchronise button and HireHop will import all bank accounts and nominal codes from your QuickBooks account. You should delete all the ones you won’t use in HireHop (you can add them back later). There will be one bank account and two nominal codes in bold, these are your defaults that can be changed. The defaults are the ones selected when you don’t assign a nominal to an item. Once finished, click Next.
- The next page is your “Tax codes”, again click the Synchronise button and HireHop will import them from QuickBooks. Again you can edit and change the defaults from the automatically set ones. Once finished, click Next.
- Lastly is the “Contacts” page. You don’t have to import these, but if you do, you can match ones that are already in HireHop, import others and delete the ones you won’t use. Once finished click the Save button.
You will now see QuickBooks in the Accounting Packages table and some red flashing “Assign” buttons. As HireHop can support multiple accounting packages in the same installation, different ones for individual depots or groups of depots, you have to set which depots use this version of QuickBooks. Also HireHop has tax and nominal groups, again, these need to be assigned to QuickBooks ones.
- Click the Assign button next to the “Accounting packages” table, click on the depot and select “QuickBooks” and then click the Save button. If a depot is not set, it will use the default accounting package, if a virtual depot is not set, it will use the parent depot’s accounting package.
- Click the Assign button next to the “Nominal groups” table, click on the QuickBooks row and each column to assign a nominal code to a nominal group. Once finished, click the Save button. Any nominal group not set will resort to the default revenue or expense nominal code.
- Lastly, click the Assign button next to the “Tax groups” table, click on the depot rows assigned to QuickBooks and click in each column to assign the appropriate Tax codes to the depot, and then click the Save button.
You have now setup QuickBooks and we are ready to go.
Find out more and try QuickBooks Accounting Software for free.